
The Format/Output tab is used to define how the export is formatted and how it is delivered.
The Format/Output tab is divided into two sections:
- Format
- Output
| |
The Format/Output tab is used to define how the export is formatted and how it is delivered. The Format/Output tab is divided into two sections:
|
In the Format section, you can specify to export information in one of the following formats:
Excel (default setting)
ASCII delimited
When an export format is selected, controls specific to that format will appear.
If you want information exported to an Excel file, perform the following:

|
|
If you want information exported to an ASCII delimited file, perform the following:
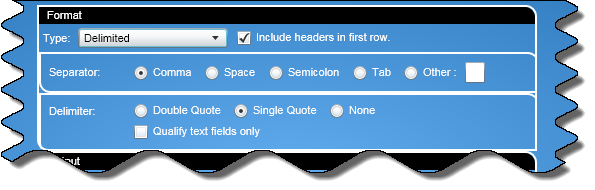
From the Type list box, select Delimited and controls for exporting an ASCII delimited file will appear.
There is a Headers in First Row check box that will include a header row containing the field names selected at the Fields tab: default - checked.
In the Separator section, select a character to be a field separator in the export file:
Comma (default)
Space
Semicolon
Tab
Other (If Other is chosen, you must enter a single character in the adjoining text box that will be used as the separator.)
In the Delimiter section, select a delimiter to surround each field:
Double Quotes (default)
Single Quotes
Click None if you do not want to use a delimiter
Click the Qualify Text Fields Only check box if you want just text fields to be delimited. Numeric fields will not be delimited if this check box is selected: default - unchecked
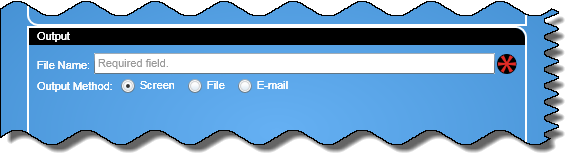
In the Output section, you specify if the export is:
Displayed on your screen (default setting)
Saved to a file
Delivered via e-mail to a recipient
Note: Regardless of option chosen, you must specify a file name.
If you want to display the export to your screen, perform the following:
 |
|
In the File Name text box, enter a name for the export, (the
 indicates a file name is required).
Click the Screen option button.
After specifying the columns at the Fields tab and specifying constraints at the Constraints tab, click the Export button and the export will display on your screen.
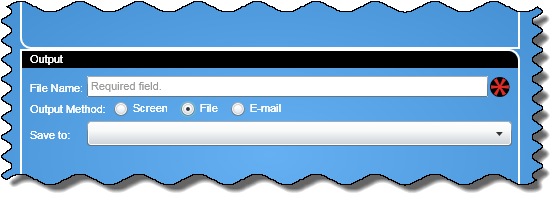
If you want to save the export to a hard drive, perform the following:
In the File Name text box, enter a name for the export, (the
indicates a file name is required).
Click the File option button.
The Save To drop down list box will allow you to select a directory in which to store your file.
After specifying the columns at the Fields tab and specifying constraints at the Constraints tab, click the Export button and the export will be saved to the specified location.
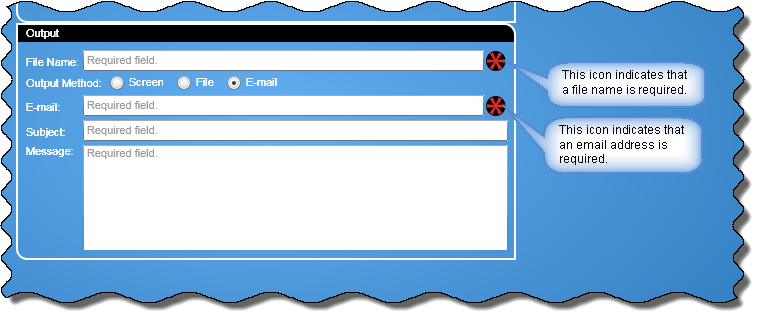
If you want to e-mail the export, perform the following:
In the File Name text box, enter a name for the export. This is a required field.
Click the E-mail option button.
In the E-mail text box, enter the e-mail address of the recipient of the export. If there are multiple recipients, separate each address with a semi-colon. This is a required field.
In the Subject text box, enter the topic of the export. This is a required field.
In the Message text box, enter a message that will be the body of the e-mail. This is a required field.
After specifying the columns at the Fields tab and specifying constraints at the Constraints tab, click the Export button and the export will be e-mailed as an attachment to the specified recipient(s).