In this Topic Hide
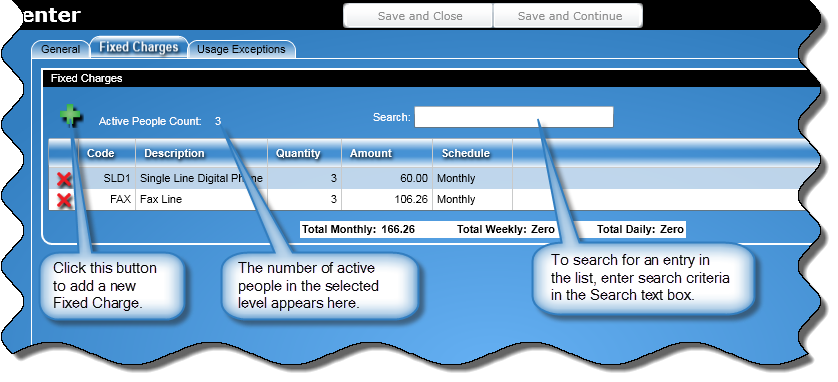
Using Directory Tools, fixed charges are added to the Fixed Charges Pool. Once in the Fixed Charges Pool, a fixed charge can be added to a an entire organization level. The Fixed Charges tab is used for:
Displaying Fixed Charges for people in the current organization level
Assigning Fixed Charges to an entire organization level
Note: The Fixed Charges tab will appear only for the lowest organization level (i.e., the level above a person).
At the top of the Fixed Charges tab are controls that let you add and search for fixed charges. If there are more than 10 fixed charges in the list, navigation controls appear that let you navigate through the list.
At the bottom of the Fixed Charges tab, totals are displayed for the assigned fixed charges. The totals are broken down by the charges' accrual schedule.
To assign a fixed charge to an organization level, perform the following:
Click the Add button ![]() to display the Add Fixed Charges dialog box:
to display the Add Fixed Charges dialog box:
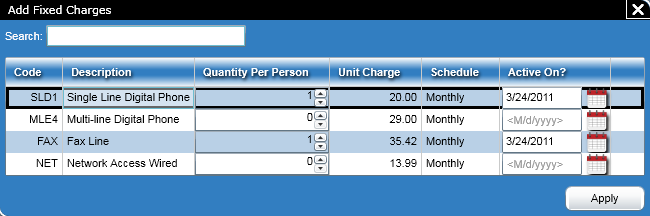
If you need to search for a charge, enter your search criteria in the Search text box. As you type, the entries in the list will shorten depending on your search criteria.
In the Quantity column, specify how many units of the charge to apply to the organization level.
Next, specify an Active on? date by entering the date in the mm/dd/yyyy format or click the calendar button and select a date.
Click the Apply button to assign the charge to every person in the organization level.
To delete a fixed charge from an organization level, perform the following:
Click the Delete button ![]() in the row containing the charge.
in the row containing the charge.
A Delete Options dialog box will appear.
There, enter the date the charge is to be deleted in the text box or click the calendar button and select a date.
At the top of the screen is a search text box that lets you search for fixed charges. To use this text box, perform the following:
Enter your search criteria in the Search text box. As you type, the entries in the list will shorten depending on your search criteria.
If there are more than 10 fixed charges in the list, navigation controls appear that let you navigate through the list. To navigate through the list, use the following buttons:
![]() - Click this button to return to the first page of the table.
- Click this button to return to the first page of the table.
![]() - Click this button to display the previous page in the table.
- Click this button to display the previous page in the table.
![]() - Click this button to display the next page in the table.
- Click this button to display the next page in the table.
![]() - Click this button to move to the last page in the table.
- Click this button to move to the last page in the table.
Enter a page number in the text box to move to that page.
Click the Save and Close button to save the information for the organization level entered at any of the tabs and close the Add "Organization" or Edit "Organization" screen.
Note: A organization name is required and it needs to be unique in its organization level.
When you click the Save and Continue button, the information entered at any of the tabs for the new organization level entered is saved and a blank Add "Organization" screen will open where you can add another organization level.
Note: When adding an organization, an organization name is required and the name needs to be unique in its organization level.
When editing an organization level and after clicking this button, the information for the next organizational entity in the directory tree will appear. When you reach the bottom of the directory tree, you will be taken back to the top of the current organization level.
![]()