When you click on the export button ![]() from the Facilities screen,
the following screen will be displayed.
from the Facilities screen,
the following screen will be displayed.
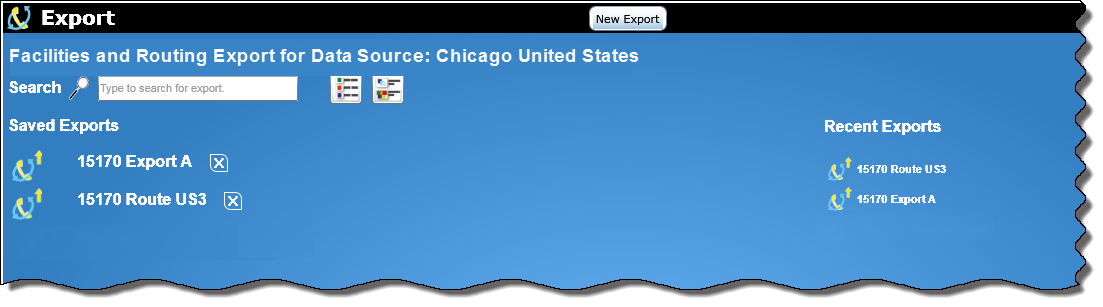
The text below the title bar shows the type of export “Facilities and Route Lists for Data Source:” and the Data Source that was chosen on the main facilities screen e.g. Chicago United States.
The left-hand side of the menu displays:
A Search text box
Saved Exports
The dynamic Search text box allows you to search through all of the saved exports.
Note: When specifying search criteria for an export, you are searching on the export name or keywords related to that export.
To search for an export, follow these steps:
In the Search text box, enter your search criteria.
As you type, the list of exports will shorten depending on your search criteria.
Select the desired export from the Saved Exports section.
Next to the Search text box are two buttons that, when clicked, will either display or hide details of the exports.
When you click this button, just the titles of the exports are displayed. |
|
When you click this button, the titles as well as a detailed description of the exports are displayed. |
This section of the Facilities export screen displays saved exports in alphabetical order.
Click on an export name to access that export.
To the right of the import name is a Delete
button ![]() .
When clicked, a confirmation screen will appear asking if you want
to delete the export.
.
When clicked, a confirmation screen will appear asking if you want
to delete the export.
Note: If you click on delete, a pop-up screen will be displayed to confirm the deletion - e.g. if you have a saved configuration called "15170 Export A", the following popup screen would be displayed:
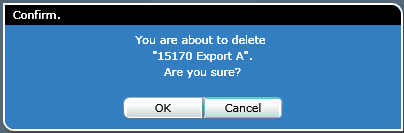
Click OK to delete the configuration or click Cancel to close the confirm screen without deleting the configuration.
To modify an existing export configuration name click on that name and an export editor screen will be displayed for you to then modify the contents, (reference the editor screen information described below).
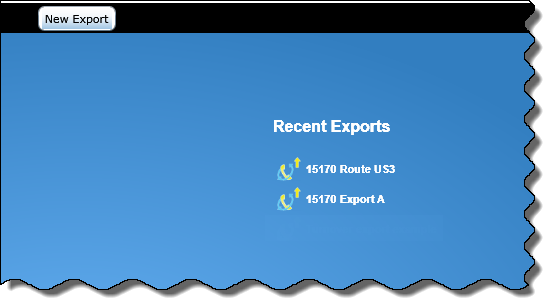
On the right side of the screen, a list of Recent Exports will be displayed from which you can choose an export name to modify the configuration (example as shown below).
When you click on either the New Export button (in the title bar) or select an export from the Saved Reports, a tabbed Export Editor screen will be displayed (as shown below).
This screen contains three tabs that let you create exports.
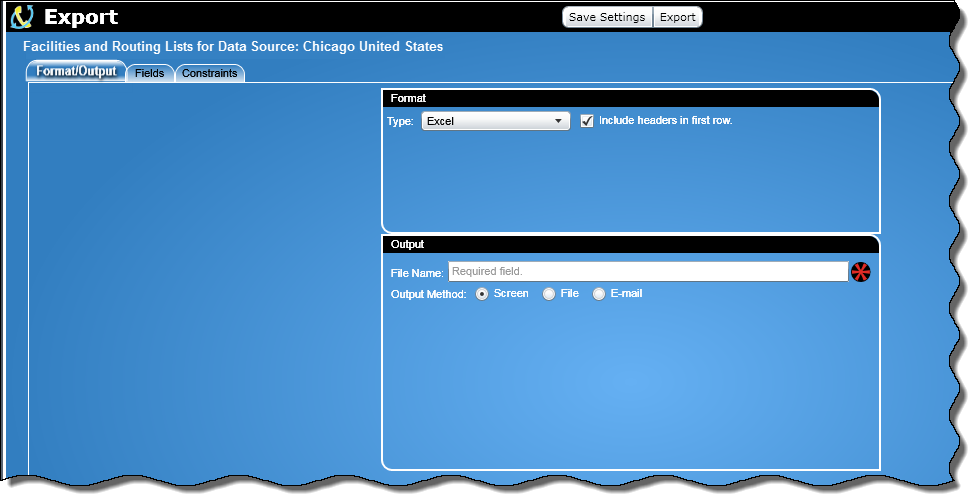
The export editor screen contains the following sections:
In the title bar there are two buttons, which consist of:

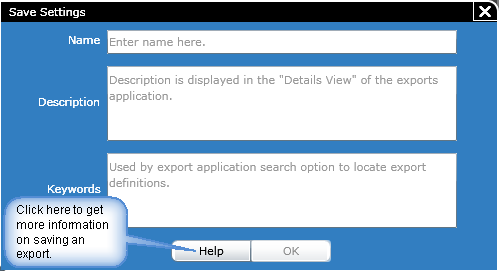
When you click on the Save Settings button, the following screen is displayed:
Note: If an existing configuration was chosen on the “Export Editor” tab above, the fields will be populated with the existing information allowing the user to make modifications.
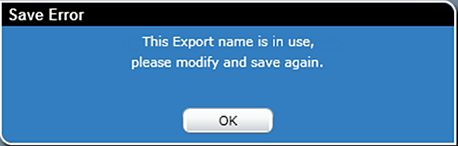
Note: If, on a new export, an existing name is entered and you click the OK button, a pop-up screen will be displayed requesting that you modify the name (example as shown below).
To save an export configuration, perform the following:
Enter a name for the configuration in the Name text box.
Note: This is a required field.
In the Description text box, enter a description of the export. The description you specify will appear in the "Details View" of the exports application.
Note: This is a required field.
In the Keywords text box, you can provide optional additional keywords which will be used by the export application search option for locating export definitions.
Note: This is a required field.
Click the OK button to save the export.
Note: The OK button is not available (grayed out) until all three sections have been populated.
When you click this button, the export will be generated. Depending on the settings specified at the Format/Output tab, the export will either:
Note: You must specify a file name at the Format/Output tab and a column at the Fields tab for the Export button to be active.
Note: If all the Key fields were not included in the export, the following warning message will be displayed:
![]()
You can then either cancel the export or continue.
Below the buttons are three tabs:
 |
The Format/Output tab is used to define basic design options.
The Fields tab is used to select the fields and specify their properties for the export.
The Constraints tab is used to select constraints (filters) to narrow your search of data to be included in your export. |